

Remodeling the old building is an indispensable part of the modern world, so to be concord with modern construction installation or removing drywall plays a key role in the aesthetic and practicality of the buildings. Before starting to collapse drywall, it is recommended to consider these vital steps to save your time and money. In the following, we will show you how to tackle the task of demolishing drywall most safely and efficiently.
It goes without saying that, all facets of our lives have been revolutionized by the advent of technology and it also has been affecting in demolishing of drywalls. Removing the nails and screws will aid in removing the drywall without causing excess dust to disperse everywhere. As the drywall is not expensive, throw them off. If possible, put drywall chunks directly into heavy-duty garbage bags or a disposable container. Once all of the drywall is removed, pry loose any drywall nails or screws that remain on the studs.
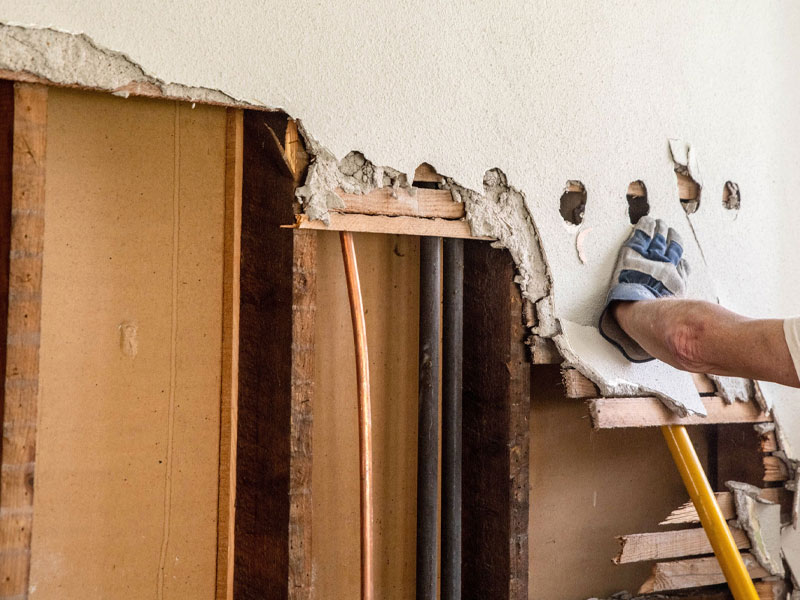
The following steps will tell you how to remove drywall safely.
STEP 1.
Prep Wall
To safety, turn the power off to the panel and take off the cover plates from the wall boxes. In the process of removing drywall, you can use a knife to cut through joint tapes and compounds. Using a saw to cut the stud is sometimes practical.
STEP 2.
Make Handholds
Sequences of hammer holes along the stud bays help with easy removal. Ensure you avoid causing any damage to concealed plumbing lines, heat ducts, and wiring.
STEP 3.
Remove Drywall
Take hold of the drywall and pull it down, breaking it into smaller pieces. To minimize unnecessary contact, place the fragments directly into the trash.
STEP 4.
Clean Up
By displacing nails or extracting screws, ensure the cleanness of the stud. You can also ensure complete examination of each fastener, by employing the edge of a putty knife or the edges of your hammerhead along the stud. Even if you intend to remove the wall, removing the fasteners guarantees the safety of the studs.
How to get rid of drywall dust?
Cleaning up dust and getting rid of it may be challenging us, but there are effective methods to minimize dust while cutting drywall. Discover techniques to reduce dust and keep the area tidy during drywall work.
Five ways to reduce dust when cutting drywall
Minimizing the mess while cutting drywall is possible by implementing a few techniques. Here are a few methods to reduce dust levels during the process.
1. Use the right tools
Proper tools are essential for cutting installed drywall efficiently and minimizing dust. While power saws are commonly used, they create a significant amount of dust. A jab saw is a better option as it produces less dust and allows for more control over the cut without disrupting plumbing and electrical components. You can use a wet-dry vacuum nozzle to collect dust while cutting the wall. Employing a metal-cutting blade on the jab saw can reduce dust further, as the fine teeth remove less material compared to a standard blade.
Other tools like circular saws, knives, oscillating tools, cut-out rotary tools, and more are also essential when installing and cutting drywall.
2. Cover your heat and air conditioner vents
Your air ducts and radiators quickly circulate dust through your house. The dust can also damage your air filters. Turn off your AC. Seal the vents with tape and plastic. Don’t forget to change your air filter once you’re done cutting your drywall.
3. Opt For Scoring
Scoring drywall is a simpler and cleaner method compared to other techniques. This approach is suitable for cutting drywall that has not been installed on the wall yet. It allows you to cut the pieces before securing them to the studs.
To make a guideline for cutting, draw straight lines using chalk. Then, with a sharp knife, carefully cut through the paper and into the gypsum core of the drywall sheet. Then, fold the drywall along the cut, causing the gypsum to break. Take caution while folding to avoid damaging the drywall, as it will break along the scored line. Next, cut the paper on the opposite side to separate the pieces. Finally, use a sanding block to smooth out any uneven edges, resulting in a smooth and flush edge. Keep in mind that the cut may not be smooth, but this is not problematic.
4. Use a box fan
Box fan can control the spread of dust. To do this, you will need a box fan, two plastic sheets, and tape. Start by unfolding one plastic sheet and securing it to the floor with tape. This will minimize the amount of cleaning required. Then, position the fan in an open window to blow the air outside. Hang the second plastic sheet from the doorway and tape it securely to prevent air from passing through. Ensure that there is minimal or no space at the bottom of the door. Now you can proceed with cutting the drywall. This method is ideal for those looking for something that’s not time-consuming. It’s also affordable.
5. Get an air scrubber
An air scrubber works as a powerful filter, effectively capturing sizable dust particles and dust mites that may become airborne during a renovation. It can also eliminate mold spores and various allergens. Simply plug in and switch on the air scrubber to utilize it while cutting or sanding drywall. Specifically engineered for construction purposes, a commercial air scrubber can effectively manage the substantial amount of dust produced during any construction project.
How to treat drywall dust inhalation
Those experienced in drywall work know that the risk of inhaling drywall dust, which can cause respiratory problems like lung irritation, inflammation, and persistent coughing. Failure to take necessary precautions against inhaling drywall dust can result in severe health complications.
Drywall is made up of minerals such as gypsum and silica, and these minerals are found in drywall dust. Once breathed in, some gypsum or silica will stay behind and cause damage to your lungs. You will experience symptoms like shortness of breath, coughing, and tightness in your chest.
Before starting treatment for inhalation of drywall dust, it is crucial to ascertain if the symptoms are indeed caused by the dust and not due to personal health issues. If the dust is causing discomfort to your eyes and nose, it is a matter of concern. In such cases, you need to make an appointment with a doctor to give some pieces of advice.
Leave A Comment